Witch Doctor
*  Witch Doctor's iconic
  Death Ward is a perfect spell for Rubick to output high damage.
* Death Ward requires channeling which makes Witch Doctor a clear tagret for stealing. Rubick can steal the spell outside of Death Ward's attack range most of the times.
* Note that an skilled Witch Doctor player can cast  Voodoo Restoration to disrupt their last spell for Rubick to steal.
*  Telekinesis can interrupt a channeling Death Ward. With Death Ward's high burst damage, combining Death Ward and Telekinesis to hold enemy in place can result in a solo kill in the early game.
*  Paralyzing Cask provides an additional disable. The ability also helps moderately with farming.
* Voodoo Restoration provides some utility by healing Rubick and his team.
*  Maledict is a damage-over-time nuke that amplifies the damage enemy taken.
* Telekinesis can reposition the enemy within the range of Maledict.
Additional:
* Rubick can steal Death Ward easily as it is a channeled ability and then use it to turn teamfight to his advantage.
* However, a skilled Witch Doctor will toggle Voodoo Restoration immediately after placing his Death Ward to prevent that.
Weaver
*  Arcane Bolt has a long range and a low cooldown, and is a great spell to waste Linken's Sphere. It also serves as an effective spell to harass Weaver with.
*  Ancient Seal prevents Weaver from using Shukuchi or Time Lapse.
Witch Doctor
* Without Dust of Appearance or Sentry Wards, Riki is able to silence Witch Doctor with  Smoke Screen, and is likely to build a Diffusal Blade, leaving Witch Doctor without mana to cast Voodoo Restoration, as well as Skull Basher to interrupt Death Ward.
Weaver
* Smoke Cloud prevents  Shukuchi and
  Time Lapse, leaving Weaver helpless against Riki.
*  The Swarm is ineffective against Riki because invisibility instantly removes the beetles.
Witch Doctor
* Like any hero with a channeled spell,  Last Word is a counter to it.
*  Global Silence goes through spell immunity and prevents Witch Doctor from casting his spells.
Weaver
* Silences and other types of lockdown that prevent Weaver from using his spells:  Silencer,
  Riki,
Riki,  Lion,
Lion,  Legion Commander,
  Shadow Shaman,
  Bane.
Bane.
Witch Doctor
* Heroes with plenty of summons, such as  Broodmother or
  Nature's Prophet can have their minions soak up most of your Paralyzing Cask.
Weaver
* Sprout with True Sight items ( Sentry Ward or
  Dust of Appearance) make it possible to trap Weaver in lane, unless he buys
  Quelling Blade or until he unlocks Time Lapse.
* The Swarm beetles can be destroyed with Nature's Prophet's Treants.
Witch Doctor
* Heroes with powerful channeling abilities are easily interrupted by Phantom's Embrace: Bane,  Pudge, Witch Doctor,
  Crystal Maiden,
  Enigma.
Weaver
* Phantom's Embrace and Soulbind prevent Weaver from using Shukuchi or Time Lapse to escape.
* Ink Swell discourages Weaver from moving through and damaging allies with Shukuchi.
Witch Doctor
* Death Ward can be easily canceled by Jakiro, or even turned against him with Macropyre, due to it's attack range being smaller then Jakiro's cast range. And Crystal Maiden, his Scepter does not allow him to move while using it.  Voodoo Switcheroo is even easier to land Jakiro's Macropyro/Ice Path combo. And unlike Crystal Maiden, Witch Doctor's Aghanim's Scepter upgraded Death Ward does not allow him to move while using it.
* While Maledict can be quite effective on Jakiro, along with repetitive stuns from Paralyzing Cask, it is very difficult to get a strong Maledict on him. Although Witch Doctor's Paralizying Cask, Maledict and Death Ward combo will still quickly eliminate Jakiro.
* On the other hand. Voodoo Restoration will partly protect his allies from Jakiro spells, as it heals based on their Max Health once he gets his Talent (Level 25). Before then though, it won't make a dent in the damage Jakiro deals.
Weaver
* Weaver has poor health, relying on Shukuchi and Time Lapse to survive, With Jakiro's considerable arsenal of stuns, Weaver cannot initiate on Jakiro without being punished heavily or even killed in return.
* While difficult, Ice Path can catch Weaver during Shukuchi, And since Shukuchi only lasts 4 seconds while Ice Path's stun lasts 3.5, the stun from Ice Path will strip him of his escape.
* Weaver has to be very careful casting Time Lapse around Jakiro, as it could very easily put him inside of a Macropyre or Ice Path.
Weaver
* Heroes with good mobility to avoid Jakiro's abilities and with good chase to punish Jakiro from pushing a tower:  Bloodseeker,
  Ember Spirit,
  Juggernaut,
  Phantom Assassin,
  Weaver.
Witch Doctor
* Heroes with channeled abilities can be interrupted by a long-range Fissure: Crystal Maiden, Witch Doctor, Bane,  Pugna, Pudge.
Weaver
* Earthshaker's many stuns can lock down slippery heroes like  Slark in his
  Shadow Dance and Weaver in his Shukuchi.
Witch Doctor
* Vengeful Spirit has two abilities to interrupt Death Ward, even through Black King Bar.
Witch Doctor
* It is especially easy for Oracle to negate the damage from Maledict, and even heal through it with  Fate's Edict and
  Purifying Flames.
* If by some miracle an enemy is still about to die because of Maledict, he can still save him with  False Promise.
Weaver
* Berserker's Call is one of the best ways to lock down Weaver before he has a chance to use Time Lapse. It can also catch Weaver in Shukuchi.
* Weaver's high attack speed, along with high attack damage from  Geminate Attack, triggers Counter Helix continuously and the output damage would be returned by
  Blade Mail.
Additional:
*  Berserker's Call is one of the best ways to lock down Weaver before he has a chance to use Time Lapse. It can also catch Weaver in Shukuchi.
* Due to his fast attack speed from Geminate Attack and items that give attack speed,  Counter Helix will activate a lot, and the damage would be returned by Blade Mail, which hurts Weaver far more than it hurts Axe.
*  Culling Blade can finish off Weaver's low health pool before he escapes with Shukuchi and Time Lapse.
*  Battle Hunger is a good tool to pop Weaver's
  Linken's Sphere due to its low cooldown.
Weaver
* Shadow Shaman's many disables can lock down Weaver. Even with Linken's Sphere, Weaver might not be able to escape should Shadow Shaman uses Shackles quickly enough following Hex.
* Mass Serpent Wards can make short work of Weaver once he is locked down.
Weaver
* Weaver relies on Shukuchi to escape and kite enemy heroes. Slardar's Corrosive Haze lowers armor and reveals Weaver, who is already a very frail target.
* Weaver usually builds Linken's Sphere, Corrosive Haze can be used to pop the spell block, additionally the level 25 undispellable talent will prevent Weaver from removing Corrosive Haze with Time Lapse, allowing allied heroes to use their abilities on Weaver.
Additional:
*  Corrosive Haze lowers armor and reveals Weaver during Shukuchi, who is already a frail target. In addition, Weaver usually builds Linken's Sphere, and Corrosive Haze can be used to "pop" the spell block. His level 25 talent can also make Corrosive Haze undispellable by Time Lapse, which puts Weaver in an even worse situation.
*  Guardian Sprint can dodge Weaver's bugs with the movement speed bonus.
Weaver
* A well-timed Gust will prevent Weaver from escaping, and a silenced Weaver usually dies very quickly.
* Weaver gains a lot of armor, which is bypassed by Marksmanship.
Additional:
* A well-timed  Gust followed by
  Frost Arrows will prevent Weaver from escaping with Shukuchi. A Weaver silenced for more than 3 seconds usually dies very quickly.
* Due to her high attack speed, Drow Ranger can easily kill The Swarm beetles.
Witch Doctor
* Sacred Arrow can be used to interrupt Death Ward from a safe distance, forcing him to cancel it to dodge or get hit.
* Paralyzing Cask is a slow-moving stun, and Mirana can Leap away from her allies to keep it from bouncing.
* Witch Doctor has low health and can easily be killed with an  Aghanim's Scepter combo or just when hit with an arrow.
Weaver
* A well-timed Fireblast with Multicast can prevent Weaver from escaping with Shukuchi and even Time Lapse.
* Ignite's high damage early on applies heavy pressure onto Weaver's very small health pool.
* However, the slow from Ignite is generally useless against Shukuchi, and Time Lapse dispels it if needed.
Weaver
* The long silence of  Crippling Fear at night prevents Weaver from using his Shukuchi or Time Lapse.
* With  Dark Ascension and
  Gem of True Sight, Night Stalker can easily find and probably kill Weaver.
*  Hunter In the Night's attack speed bonus removes The Swarm's beetles very quickly.
Witch Doctor
* Death Ward does little damage against Dragon Knight's armor, and Dragon Knight's high health regeneration minimizes damage from Maledict.
Witch Doctor
*  Kraken Shell dispels the stun from Paralyzing Cask. However, it does not dispel the damage from Maledict.
* Once Witch Doctor first uses his Death Ward in team fights, Tidehunter can simply cancel it with  Ravage, turning the tables against him, especially if Witch Doctor does not have a
  Black King Bar.
* As a precaution, Witch Doctor should let Tidehunter use Ravage first before channeling Death Ward to turn a team fight in his favor.
Weaver
*  Arc Lightning has a low cooldown can used to pop his Linken's Sphere.
*  Lightning Bolt or (
 Nimbus upgraded from Aghanim's Scepter) detects Weaver during Shukuchi, preventing his ganks.
*  Thundergod's Wrath can kill Weaver quickly before he can cast his Time Lapse at low health.
Weaver
* Weaver's exceptional ability to elude and survive through clashes and ganks is hard countered by Lion in every aspect.
* Weaver is very mana dependent and has a rather small mana pool in the beginning of the game, of which  Mana Drain can deplete and lessen his early game presence.
*  Earth Spike followed by
  Finger of Death in the huge majority of the time is enough to kill Weaver.
* Earth Spike can be point targeted to hit through Shukuchi.
*  Hex's has a fair long duration, by which Weaver will not be able to deal damage, or even survive a coordinated attack, and it is single target, of which cannot be dodged.
* Mana Drain easily breaks Linken's Sphere. Its low cooldown allows Lion to infinitely break it whenever it recharges.
* Earth Spike and Hex when paired for the longer lengths of disables may diminish Time Lapse efficiency, possibly causing Weaver to not undo as much damage as he would.
Weaver
*  Ball Lightning allows Storm Spirit to close the gap between him and Weaver in no time. Once locked down with certain items, Weaver is extremely fragile to Storm Spirit and his teammates.
Weaver
* Shukuchi cannot help Weaver escape from Arena of Blood, and can most likely die if detected through invisibility.
* If pinned to the arena's walls, Time Lapse tends to not be enough to save Weaver, as God's Rebuke can keep him burst down thanks to its damage scaling.
* The Swarm and Geminate Attack are not enough to pierce through Bulwark.
Witch Doctor
* Morphling can  Attribute Shift to strength after being hit by Maledict. Since Maledict deals its damage based on the difference between HP on cast and HP after two seconds, odds are Morphling will have more HP than when Maledict was cast, thus resulting in no damage.
* On the upside, players prone to panicked reactions may Morph to agility, making Maledict even more efficient than intended.
*  Adaptive Strike (Strength) can interrupt Death Ward at a decent range.
Weaver
* Heroes with high mobility can be prevented from using it to their advantage with Earthbind, even if they pack a dangerous arsenal:  Earth Spirit, Ember Spirit,
  Storm Spirit, Nature's Prophet, Phantom Assassin, Riki,
  Anti-Mage, Weaver.
* See items and abilities disabled by roots
Witch Doctor
* Heroes with plenty of summons, such as Broodmother or Nature's Prophet can have their minions soak up most of your Paralyzing Cask.
Witch Doctor
* Stone Form can easily interrupt heroes with long channeling spells, like Crystal Maiden, Bane, Witch Doctor, or Enigma.
Witch Doctor
* Heroes with slow movement speeds and small health pools (supports like Crystal Maiden or Witch Doctor) are easy targets for Phoenix. Should they be inflicted by its DOT debuffs, they will be very quickly killed without even getting a chance to fight back.
Witch Doctor
* Heroes that depend on disrupting fights with ability combos or big ultimate abilities are vulnerable to the long stun of Fiend's Grip:  Disruptor,
  Death Prophet, Enigma,
  Faceless Void,
  Invoker,
  Lich,
Lich,  Magnus,
  Mars,
Mars,  Medusa,
  Outworld Destroyer,
  Phoenix,
  Puck,
Puck,  Queen of Pain,
  Shadow Fiend,
  Treant Protector,
  Underlord,
  Winter Wyvern, Witch Doctor,
  Zeus.
Zeus.
Weaver
* Low-health, normally mobile carries who rely entirely on raw attack damage are vulnerable to Bane's nukes and disables: Anti-Mage,  Clinkz,
  Drow Ranger, Faceless Void,
  Gyrocopter, Juggernaut,
  Meepo,
  Mirana,
  Monkey King,
  Morphling, Phantom Assassin,
  Phantom Lancer, Riki, Shadow Fiend, Slark,
  Sniper,
  Terrorblade,
  Troll Warlord, Weaver.
Weaver
* Heroes who commonly buy Linken's Sphere:  Luna, Weaver, Morphling, Queen of Pain, Ember Spirit.
Witch Doctor
* Low health spellcasters:  Lina, Witch Doctor,
  Tinker,
  Keeper of the Light, all rely heavily on their spells and are fragile heroes. They all also have avoidable spells, allowing Puck to get to them and quickly burst them down.
Witch Doctor
* Low mobility heroes: Heroes with no/little means of traveling fast have difficulty getting to/away from Bounty Hunter due to his slowing Jinada and hastening Track. Few examples of such heroes are: Crystal Maiden, Sniper,  Ursa, Witch Doctor, etc.
Weaver
*  Bounty Hunter has a cheap way to break Linken's Sphere and keep track of Weaver while he is using Shukuchi, though both can be dispelled with Time Lapse.
Weaver
* Weaver with Time Lapse
* Heroes that can remove the Track debuff with their skills:
*  Abaddon with
  Aphotic Shield and
  Borrowed Time
*  Huskar with
  Life Break
* Juggernaut with  Blade Fury
* Legion Commander with  Press the Attack
*  Lifestealer with
  Rage and
  Infest
*  Naga Siren with
  Mirror Image
*  Omniknight with
  Heavenly Grace
*  Oracle with
  Fortune's End and False Promise
* Phantom Lancer with  Doppelganger
* Slark with  Dark Pact
* Ursa with  Enrage
* Weaver with Time Lapse
*  Tidehunter with Kraken Shell when damage received reaches the threshold.
Weaver
* Even though Linken's Sphere will block your silence, you can cast Arcane Bolt to break it or wait until someone on your team breaks it. In addition, Linken's Sphere builders are usually squishy targets vulnerable to silences: Weaver, Queen of Pain, Morphling, Clinkz, etc. Don't forget that Ancient Seal also increases the magical damage these enemies take, along with silencing them.
Additional:
* Arcane Bolt has a long range and a low cooldown, and is a great spell to waste Linken's Sphere. It also serves as an effective spell to harass Weaver with.
* Ancient Seal prevents Weaver from using Shukuchi or Time Lapse.
Witch Doctor
* Heroes with long channeling abilities like Witch Doctor are easy targets for Kunkka to interrupt in team fights.
Additional:
*  Torrent can cancel Death Ward from a far distance.
Weaver
* Frostbite will reveal invisible heroes for its duration, making it a good tool against any such hero (Riki, Bounty Hunter, Weaver, or Clinkz for example), or as a soft counter to  Shadow Blade, if it is used first. This can be an amazing tool to ensure that Dust of Appearance is used on the unit in question, and not wasted in not catching anything.
Witch Doctor
* Heroes who rely on channeling abilities can be interrupted in teamfights by Rolling Thunder: Crystal Maiden, Pugna, Witch Doctor
Witch Doctor
* Death Ward's first target (before it bounces) can evade it, therefore  Windranger and Phantom Assassin are poor choices to use it on.
Weaver
* Techies is very good against roaming supports and gankers such as Bounty Hunter, Riki, Weaver,  Earthshaker,
  Nyx Assassin, etc. that are constantly moving around the map.
Witch Doctor
* Heroes who have channeled abilities can be stunned by Light Strike Array, like Witch Doctor with Death Ward and Bane's  Fiend's Grip.
Additional:
*  Light Strike Array cancels out Death Ward from a long distance.
Witch Doctor
* Fragile support heroes are all ideal targets for the Phantom Assassin. Heroes such as Lina and Witch Doctor are all prime targets that may not be able to react quickly and fight back due to Phantom Assassin's sudden appearance.
Weaver
* Weaver cannot Time Lapse out of Huskar's burn damage.
Weaver
* Heroes with abilities that reduce armor will make Huskar very vulnerable: Weaver,  Dazzle,
  Bristleback,
  Vengeful Spirit.
Weaver
*  Spiked Carapace allows Nyx to get an easy long-duration stun on Weaver once he uses Shukuchi, and then he can follow up with
  Impale.
*  Vendetta works as a great setup for both Impale and Spiked Carapace and can deal decent damage to Weaver. Additionally he can neutralize The Swarm beetles due to his invisibility duration.
Witch Doctor
* Heroes who build Black King Bar as either core or situational item will be able to fight back against Nyx Assassin and freely attack him as Spiked Carapace cannot pierce spell immunity at all:  Axe, Broodmother,
  Dawnbreaker, Enigma, Huskar,
  Jakiro, Legion Commander, Lina, Luna,
  Lycan,
  Slardar, Slark, Troll Warlord, Witch Doctor.
Witch Doctor
*  Guardian Angel protects allies from Death Ward's physical damage.
*  Purification and Heavenly Grace will most likely save teammates from dying to Maledict.
Weaver
* Heroes that rely on slows or low-duration stuns have trouble catching Weaver: Omniknight, Lich.
Weaver
* Shukuchi vision can easily target Charge of Darkness before Weaver purchase Linken's Sphere.
Additional:
* Spirit Breaker's strong escape combo abilities from  Charge of Darkness and
  Bulldoze can easily catch Shukuchi from Weaver.
* Time Lapse cannot dispel neither Charge of Darkness nor  Nether Strike.
* However, Weaver is a common Linken's Sphere wielder. And if he has it, Spirit Breaker will not be able to catch up with Weaver neiter with Charge of Darkness nor with Nether Strike.
Weaver
* Heroes that usually build Linken's Sphere as either a core or situational item: Weaver, Medusa, Morphling, Queen of Pain, Storm Spirit, Luna, Naga Siren.
Witch Doctor
* Paralyzing Cask will repetively bounce between Chen and his converted creeps every single time. This can get even worse if Witch Doctor buys Aghanim's Scepter that will allow his Death Ward to bounce between Chen and his converted creeps.
* Paralyzing Cask, Maledict and Death Ward combination will often kill Chen's allies before he can save them with  Hand of God. And to make things worse, Chen has no way to cancel Death Ward on his own, and must rely on outside from {U:Centaur Conqueror} or {U:Mud Golem} under his control.
* Voodoo Switcheroo from  Aghanim's Shard cannot be interrupted by Chen's creeps at all because Witch Doctor is hidden for it's duration.
Additional:
* Paralyzing Cask will repetively bounce between Chen and his converted creeps every single time. This can get even better if Witch Doctor buys Aghanim's Scepter that will allow his Death Ward to bounce between Chen and his converted creeps.
* Paralyzing Cask, Maledict and Death Ward combination will often kill Chen's allies before he can save them with Hand of God. And to make things better, Chen has no way to cancel Fiend's Grip on his own, and must rely on outside from {U:Centaur Conqueror} or {U:Mud Golem} under his control.
* Voodoo Switcheroo from Aghanim's Shard cannot be interrupted by Chen's creeps at all because Witch Doctor is hidden for it's duration.
Weaver
* Weaver can easily kill Chen's creeps and kite Chen with The Swarm and Shukuchi.
* Neither Chen nor his converted creeps have burst damage at all, so Weaver will always have plenty of time to save himself with Time Lapse or his allies with Aghanim's Scepter upgraded Time Lapse.
Witch Doctor
* Voodoo Restoration heals to counter damage over time of Viper abilities.
* Viper has no way to cancel Death Ward, even through  Rod of Atos.
Weaver
* Shukuchi ignores slows and allows Weaver to escape Viper's onslaught.
* Time Lapse dispels  Poison Attack and
  Corrosive Skin and undoes poison damage.
* Weaver's high burst damage allows him to kill Viper before being killed.
Witch Doctor
* Death Ward with Aghanim's Scepter makes quick work of the spawned illusions from Disruption.
* However, it can be cancelled by Disruption until Witch Doctor buys Linken's Sphere or Black King Bar.
* All of Witch Doctor's abilities are active, making Demonic Purge break from Aghanim's Scepter useless.
* Voodoo Restoration can out-heal the damage from Shadow Demon's abilities.
* An attempt to save an ally using Disruption can easily become a perfect setup for a Maledict or Paralyzing Cask for the enemy.
Weaver
* You can potentially kill a fragile Weaver by using Disruption during Shukuchi with a well-placed Sentry Ward, wasting the Shukuchi. But odds are he'll wait to get low health, Time Lapse the damage away and Shukuchi away once more.
Witch Doctor
* Heroes with abilities or items that can silence or disable Anti-Mage for long periods of time will prevent him from Blinking away: Lion, Silencer, Shadow Shaman,  Grimstroke, Witch Doctor, Riki, Faceless Void,
  Skywrath Mage, Puck.
Weaver
* A well-timed use of The Swarm provides vision over heroes with high mobility: Anti-Mage,  Arc Warden,
  Dark Seer.
Weaver
* Shukuchi gets Weaver in front of Bristleback, negating the protection from  Bristleback.
* Weaver's mana break talent depletes Bristleback's mana pool, preventing him from spamming abilities.
Weaver
* Time Lapse with Aghanim's Scepter dispels Flaming Lasso when used on allied hero.
* Linken's Sphere is core item for a Weaver making him a hard target for Lasso during entire game.
Weaver
* Shukuchi can break Static Link with little trouble.
* Time Lapse can easily be used to avoid damage from Plasma Field and can recover the damage done from Static Link and Eye of the Storm.
* Eye of the Storm can't kill bugs from The Swarm.
Weaver
* Marci's Dispose is blocked by Linken's Sphere which is a common item for Weaver.
* Shukuchi allows Weaver to escape from  Rebound slow.
* The swarm beetle require 4 hits to kill. Weaver can use it on her when she use Unleash. This give Marci a hard choice: ignore The swarm and her armor keep decreasing or kill the beetle and wasting 4 attacks of Unleash.
Witch Doctor
* Maledict cannot be dispelled by Phantasm, and can be used to tag the real Chaos Knight hiding within his illusions.
* If Witch Doctor has an Aghanim's Scepter, Death Ward will bounce between Chaos Knight's illusions, destroying them quickly.
* However, Death Ward is easily interrupted by Chaos Bolt until Witch Doctor buys  Glimmer Cape or Black King Bar.
Weaver
* Sven can be easily kited since Weaver is a natural Linken's Sphere carrier and Sven relies on  Storm Hammer to disable and kill a hero.
Weaver
* Brewmaster is slow and has low armor, making his laning stage very difficult against Geminate Attack.
* Apart from the slow moving  Hurl Boulder, which can be disjointed, he has no control to catch Weaver.
Witch Doctor
* Paralyzing cask bounces between him and his wolves, keeping him stunned for long amounts of time.
Witch Doctor
* Paralyzing Cask is likely to bounce between him and his bear every single time.
* Lone Druid's lack of mobility makes him vulnerable to Death Ward and Maledict.
Witch Doctor
* Voodoo Restoration heals to counter damage over time of  Poison Nova and
  Poison Sting.
Weaver
* Weaver doesn't care much about Lich's slows thanks to Shukuchi.
* If he sees Chain Frost is targeting him, he can easily isolate himself with Shukuchi so that it stops bouncing around.
* Unless Lich bursts Weaver immediately, Lich has no hard disables or silences to prevent him from using Time Lapse.
Weaver
* Though The Swarm can be blocked by Rage, it can be used to lower Lifestealer's already low armor, making him even more vulnerable to physical damage while Rage is on cooldown.
* Lifestealer has no strong disables on his own and thus cannot catch up with nor escape from Weaver's Shukuchi.
* Lifestealer's reliance on meticulous auto-attacks will not help against Time Lapse, which can undo Lifestealer's already slow build-up of damage. Aghanim's Scepter upgraded Time Lapse can also be used to save allies from getting killed by Lifestealer, but that will require targeting the allied hero rather than just pressing the button that will trigger the Time Lapse.
Additional:
*  Open Wounds's slow is ignored by Shukuchi.
* Lifestealer has no other lockdown and relies on being on top of enemies; Weaver can kite him with ease.
Weaver
* The swarm beetle can waste Ursa's  Overpower attacks.
* Ursa has no inherent way of disabling a slippery Weaver by preventing him from Shukuchiing or Time Lapseing away, as the slow from Earthshock is useless against Shukuchi's haste effect.
Additional:
*  Earthshock's slow is ignored by Shukuchi.
* Ursa can be kited with Shukuchi and his burst damage will be negated with Time Lapse as long as Weaver survives it.
* The Swarm breaks Ursa's  Blink Dagger, forcing him to deal with the beetles.
Witch Doctor
* Heroes with magical or pure damage output will not have any problems against Atrophy Aura at all: Luna, Lina, Jakiro, Pugna, Bane,  Snapfire,
  Muerta, Nyx Assassin, Enigma, Tinker, Witch Doctor, Zeus, Crystal Maiden.
Weaver
* Heroes with Linken's Sphere as core item: Weaver, Morphling, Medusa.
Weaver
* Heroes with haste can negate Enchant's slow: Weaver, Dark Seer, Lycan,  Centaur Warrunner.
Witch Doctor
* Heroes with long-lasting, undispellable debuffs will pinpoint the true Naga Siren:  Spirit Breaker, Bloodseeker, Witch Doctor.
Weaver
* In general, Timbersaw struggles against highly mobile heroes that can avoid his abilities: Puck, Weaver, Ember Spirit and others.
Weaver
* Any hero who can survive Magnus's initiations and manfight him: Huskar, Faceless Void, Weaver, Abaddon, Troll Warlord,  Alchemist,
  Dragon Knight,
  Night Stalker,
  Viper.
Weaver
* Dark Seer's only disable is Vacuum. Though he starts off with high armor and health, he'll eventually have a hard time dealing with high mobility heroes such as Weaver or Queen of Pain.
Weaver
* Heroes that are hard to kill without lockdown: Puck, Weaver.
Witch Doctor
* Heroes with channeling abilities: Enigma, Witch Doctor, Crystal Maiden.
Weaver
* Clockwerk lacks burst damage, and that makes him vulnerable to heroes who can recover themselves and turn the fight around to their advantage after Clockwerk finishes his initiation. Additionally, Clockwerk hates buying  Dagon and
  Ethereal Blade, which are the only itmes that can help him deal with heroes who can recover themselves and turn the fight around to their advantage: Faceless Void, Terrorblade, Ursa, Weaver, Broodmother, Slark, Abaddon,
  Wraith King, Lifestealer.
Weaver
* Enigma lacks burst damage, and that makes him vulnerable to heroes who can recover themselves and turn the fight around to their advantage after Enigma finishes his initiation: Faceless Void, Terrorblade, Ursa, Weaver, Broodmother, Slark, Abaddon, Wraith King, Lifestealer.
Weaver
* Heroes who can dodge Earth Spirit's abilities: Ember Spirit, Puck, Weaver
Weaver
* Heroes with good escapes can usually outmaneuver and escape from Spectre: Slark, Clinkz, Weaver
Witch Doctor
* Heroes with channeled abilities which Assassinate may cancel at long range: Witch Doctor, Crystal Maiden, Shadow Shaman, Pugna
Weaver
* Shukuchi allows Weaver to close the gap between himself and Sniper with high speed, and to maneuver through teamfights to get on top of him.
* A combination of The Swarm and  Desolator tears through Sniper's low armor.
Witch Doctor
* Heroes like Slark, Witch Doctor and others also tend to suffer in Ice Blast's heal denial.
Weaver
* Time Lapse allows Weaver (or an ally if upgraded with Aghanim's Scepter) to regain HP while affected by Ice Blast.
* Shukuchi completely ignores the slow from Ice Vortex and helps him escape the freeze range of Cold Feet.
Additional:
*  Cold Feet is extremely easy to nullify with Shukuchi.
*  Ice Vortex does not slow Weaver in Shukuchi.
* Time Lapse will still affect his health, even when hit by  Ice Blast.
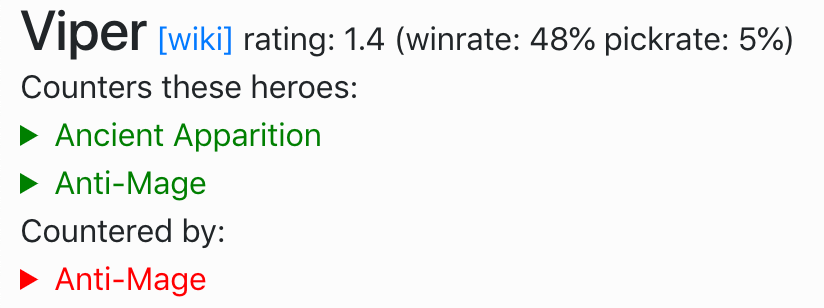
* Ancient Apparition has no escapes or saves and is very squishy, making him an easy target for Weaver to get on top of.
Witch Doctor
* Channeling heroes will not go well against Warlock, especially those who build Black King Bar as Warlock's ultimate ability stun goes through spell immunity. E.g.: Crystal Maiden, Witch Doctor, Enigma, etc.
Weaver
* Weaver's Shukuchi allows him to escape from Warlock's Upheaval with high move speed.
* Time Lapse allows Weaver to ignore damage from Warlock's Golem and escape.
Witch Doctor
* Heroes that have a channeled ability that can be interrupted by Meat Hook: Shadow Shaman, Witch Doctor, Enigma, Bane.
Additional:
*  Meat Hook interrupts Death Ward from a decent range, even through Black King Bar & Glimmer Cape.
* Pudge can survive the damage from Maledict because of his  Flesh Heap stacks.
* However the damage-over-time from  Rot is counteracted by Voodoo Restoration.
Weaver
* Shukuchi grants Weaver invisibility and a high degree of mobility for a short time, which can make him a difficult target to hook.
* The Swarm beetles are difficult for Pudge to remove, due to his low base attack time and poor agility. Additionally, it can be used to can scout out Pudge's location.
* Should an ally get snagged by Meat Hook, Weaver can use Aghanim's Scepter upgraded Time Lapse on them to send them back to where they were before hooked, even if Pudge has already started to Dismember them.
Additional:
* While Weaver is in Shukuchi, Rot doesn't slow him and Meat Hook is easy to avoid.
* Even when hooked, Weaver can use Time Lapse, negating both the damage and displacement.
* Pudge has low armor and low attack speed, making him susceptible to The Swarm and physical attacks.
*  Dismember is easy to block with Linken's Sphere and it's the only way to break Weaver's Linken Sphere.
* However, the long duration stun of Dismember can be dangerous for Weaver.
Witch Doctor
* Generally, any fragile heroes will have a hard time dealing with Undying's tankiness, and even more so if Decay is used on them. Some examples are Crystal Maiden and Witch Doctor.
Weaver
* Geminate Attack works on  Tombstone, allowing Weaver to kill it quickly.
* Zombies attacking Weaver disappear once he goes invisible with Shukuchi.
* Undying has no way to catch a mobile Weaver.
Witch Doctor
* Witch Doctor's Maledict burst damage can be prevented by Sunder if timed correctly. But it can kill Terrorblade if he has no target to be Sundered with, especially in the early game.
* Death Ward deals physical damage, and Terrorblade's high armor can help him survive against Death Ward. However, Terrorblade has no disable in his skillset at all, and he cannot stop Witch Doctor from channeling Death Ward to maximum. And if Witch Doctor owns Aghanim's Scepter, attacks from Death Ward will be able to bounce around and wipe out Terrorblade's illusions and his team.
* Terrorblade must be careful as Paralyzing Cask is commonly tricky to dodge for him due to his reliance on illusions.
Witch Doctor
* Heroes who have channeling abilities because Terrorblade has no disables to cancel them at all besides  Terror Wave from Aghanim's Scepter, and he does not like buying disabling items at all: Enigma's
  Black Hole, Witch Doctor's Death Ward, Shadow Shaman's
  Shackles, Lion's Mana Drain, Bane's Fiend's Grip, Pudge's Dismember, Crystal Maiden's
  Freezing Field, Pugna's
  Life Drain, Dawnbreaker's
  Solar Guardian, and Naga Siren's
  Reel In from Aghanim's Scepter.
Weaver
* Heroes whose core item builds includes  Monkey King Bar: Faceless Void, Windranger, Weaver, Juggernaut.
Witch Doctor
* Heroes with the ability to heal allies will not be able to heal heroes affected by  Doom:
Doom:  Chen, Dazzle,
  Io, Oracle, Omniknight, Witch Doctor, Winter Wyvern, Abaddon, etc.
Weaver
* Heroes who often build Linken's Sphere: Weaver, Morphling, Medusa.
Witch Doctor
* Paralyzing Cask's short stun rarely prevents Monkey King from ambushing Witch Doctor.
* Death Ward's long channel is easily interrupted by Boundless Strike.
Weaver
* Heroes that lack burst damage will have a difficult time taking down Monkey King, and fare badly against Jingu Mastery: Legion Commander, Lifestealer, Weaver, Wraith King
Witch Doctor
* Another hero that should not leave a special circle for his ultimate. The only thing to be afraid is  Boundless Strike.
Weaver
* Heroes that can maintain vision on Monkey King can see when he uses Tree Dance: Bloodseeker, Treant Protector with Eyes In The Forest, Sniper, Weaver
Weaver
* Shukuchi will trigger extra damage from Rupture.
* Shukuchi's invisibility is detected by Thirst.
* Time Lapse cannot dispel Rupture, preventing Weaver from escaping ganks. However, smart Weaver will buy Linken's Sphere to counter this problem for him.
Additional:
*  Rupture is particularly crippling against Weaver, who relies on high movement speed from Shukuchi to fight and escape, and it cannot be dispelled by Time Lapse.
*  Thirst detects Weaver through Shukuchi whenever his health is low.
*  Blood Rite combined with Rupture forces Weaver to either take damage from the latter, or to get silenced for a long duration.
Witch Doctor
* Voodoo Restoration heals to counter Bloodseeker's Thirst.
* Rupture is generally useless against Witch Doctor while he is staying on Death Ward.
* Although Witch Doctor needs to be careful as Blood Rite can interrupt Death Ward.
Witch Doctor
* Luna can easily cancel channeling spells with  Lucent Beam and 0.25s Eclipse Lucent Ministun talent for
  Eclipse, she can also buy
  Abyssal Blade in case they decide to buy Black King Bar: Enigma's Black Hole, Witch Doctor's Death Ward, Shadow Shaman's Shackles, Lion's Mana Drain, Bane's Fiend's Grip, Pudge's Dismember, Crystal Maiden's Freezing Field, Pugna's Life Drain, Dawnbreaker's Solar Guardian, and Naga Siren's Reel In from Aghanim's Scepter.
Additional:
* Lucent Beam interrupts Death Ward from a decent range.
* With Dust of Appearance, Eclipse kills Witch Doctor during Death Ward, even through Glimmer Cape.
Weaver
* Escape-type carries: Slark, Storm Spirit, Weaver.
Witch Doctor
* Fragile supports with low armor are always a good prey, also her Psionic Trap will wear down most attempts to flee with their built-in disables: Silencer, Crystal Maiden,  Warlock,
  Ancient Apparition, Grimstroke, Witch Doctor
Witch Doctor
* Multiple attackers thanks to summoned units or clones: Meepo, Witch Doctor, Lycan, Enigma, Shadow Shaman
* Heroes that can quickly deal damage to her, regardless of how weak they are, can easily break through her Refraction:
* Multiple attackers thanks to summoned units or clones: Meepo, Witch Doctor, Lycan, Enigma, Shadow Shaman
* Multiple attackers thanks to illusions: Phantom Lancer,  Chaos Knight, Naga Siren (bonus for her
  Ensnare). Also despite the visual effects, Templar Assassin does not spill damage against illusions or buildings, so she is not a really good hero to clean up illusions.
* Weak damage but high tick rate or persist in a long time: Slark, Gyrocopter, Queen of Pain, Shadow Shaman (Shackles), Jakiro, Pugna,  Doom
Doom
Witch Doctor
* Heroes that have small health pools and little to no escape mechanisms are even easier prey for Necrophos. Ghost Shroud's slow will allow him to catch him with them, and get nuked down with his abilities, even preventing retaliation due to Reaper's Scythe's stun. Such heroes include Crystal Maiden, Witch Doctor, Warlock or Shadow Fiend.
Weaver
* Heroes with one single-target abilities such as Wraith King,  Necrophos, or Doom will struggle against Weaver's Linken Sphere.
Witch Doctor
* Arc Warden's  Magnetic Field dodges all damage from Death Ward.
Weaver
* A well-timed use of The Swarm provides vision over heroes with high mobility: Anti-Mage, Arc Warden, Dark Seer.
Weaver
* Duel's long duration prevents Weaver from activating Time Lapse or escaping with Shukuchi.
Witch Doctor
* Paralyzing Cask can save ally from Legion Commander Duel's until she purchases Aghanim's Scepter.
* Voodoo Restoration can heal Witch Doctor allies from Duel's.
* Death Ward can help Witch Doctor allies from winning Duel's, if, he is not a target.
Witch Doctor
* Wraithfire Blast cancels Death Ward in decent range.
* Death Ward is meaningless while Reincarnation is off cooldown.
* Vampiric Aura can out-heal the {tooltip:DoT|Damage over Time} from Maledict.
Weaver
*  Wraithfire Blast is easy to disjoint with Shukuchi or Time Lapse, and it's the only way to break Weaver's Linken Sphere.
* Wraith King has no other disables and no mobility, allowing Weaver to chase or escape Wraith King as he wishes.
* With the Mana Break talent and  Diffusal Blade, Weaver can prevent
  Reincarnation from triggering until Wraith King gets his shard.
Additional:
* Weaver can run away after killing Wraith King once thanks to Shukuchi.
* Wraithfire Blast is quite predictable. If Weaver is quick, he will disjoint it with Shukuchi and proceed to chase Wraith King down.
* Shukuchi does have a fade time. They cannot disjoint it if you use it right next to them. They will be stunned and take damage; however they will still become invisible if they used Shukuchi before the stun hits.
* Weaver can easily harass Wraith King out of his lane thanks to his high base damage and Geminate Attack.
* Weaver can burn Wraith King's mana quickly with his {ValueColor:1|Mana Break|15tal} {Symbol:Talent} talent or Diffusal Blade, until Wraith King purchases Aghanim's Shard to remove Reincarnation's manacost.
Witch Doctor
* Beware of placing the Death Ward if Chronosphere is off cooldown, as it will cancel the effect and leave Witch Doctor vulnerable if he does not react in time.
Weaver
* Time Dilation while Shukuchi and
  Geminate Attack are on cooldown will make these abilities unusable for a long time, reducing Weaver's escape potential.
 Shukuchi.
 Chronosphere makes it difficult for Weaver to avoid it with Shukuchi and, once caught, his low survivability makes him an easy kill.
 Time Walk.
 Time Dilation will prevent Weaver from using Shukuchi or force him to use Time Lapse to dispel the debuff and re-engage.
* Chronosphere will reveal Weaver during
Additional:
* The wide range of
* With no significant source of burst damage, it is easy for Void to survive combat with Weaver using
*